I thought I would share the process I go through, not that it is difficult or any great secret.
Firstly treat your local op shop (or family's closet) like a yarn store and just start grabbing all those colours that give you fever or work in with your design plan. For this rug I have used knit fabric, you can get anything that is a tube; pants, t-shirts, sweatshirts, skirts. You can easily make this rug out of other fabrics. I have been collecting denim, wool sweaters and corduroy because I think these will make great rugs also. Ask at the counter - frequently they have items that are too stained or torn to be sold that they will let you have for a song. Keep in mind how many t-shirts you will use, depending on the size of the rug, so don't pay too much for them. You don't want t-shirts that have that rubber printing on them or lots of embroidery.
Back at home, waiting for a wash. One - to get rid of the op shop smell and to make sure they are all clean. Two - in case any of the colours run, you want that to happen now not once the rug is done. For ease I wash everything together and if it did run you can still cut it all up and not really notice. Be wary of small busy patterns, sometimes they can look muddy.

Now the time consuming process of cutting them up. A rotary cutter and board are a life saver at this point. For this rug I only cut out the "loops"- the body and arms. I make the loops about an inch or 3cm thick. For the last rug I cut strips and then machine sewed them together, you have a lot less waste that way. However since I plan to do a prodded rug in the near future I am keeping all of the cutoffs and will use them up for that.

Now you will have a basket full of loops. Sit down with a good cuppa (or plonk) and some good entertainment (catch up on all of those great podcasts, speaking of which "we miss you Brenda!") and start knotting those loops together. You know just like you will do with your luggage tags at the airport before you leave for your year abroad in Italy and India - wake up, refocus! Okay so chain loop all of those puppies together. It will take a while but is pretty relaxing and mindless, lots of good boob watching, a little Top Chef, a little Project Runway and you are there.

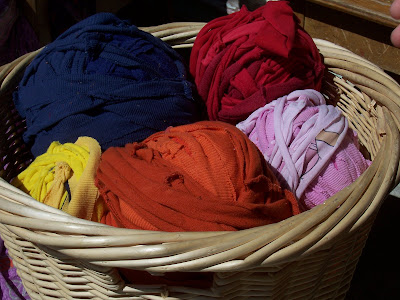
Wind up into balls and put the basket of pretty fabric balls somewhere you will see. They are pretty cool looking and worthy in their own right. Don't make the balls too big as they can become unwieldy to deal with.
I single crochet them together. I tried some other crochet stitches and did not like them as much. I don't think this rug works as well knitted. For one thing it would quickly become too heavy for your needles and for another the crochet gives you a much more dense fabric more suitable for a rug. Another plus about crochet for this project is you can easily add on where ever you fancy if you want it to be wider, etc. I am not an experienced crocheter but even I can handle single crochet so don't let the "C" word put you off. When you need to join in a colour just undo the last chain loop on the current colour and loop your new colour in; no ends to weave in.

It will be a little wonky as you go. Don't worry too much. It will kinda stretch out at the end plus that is part of it's charm. I plan to add a denim border on this one at the end which will also help to stabilise it.


1 comment:
You funny girl. You are amazing. When will you come back? oh never mind. JOY to hear from you. You inspire me from halfway around the globe.
Post a Comment